
Welcome to the 2nd part of Mustache JS and Express tutorial. Today we will finish the work begun in part 1.
Mustache JS and jQuery in action
So far we’ve discussed the basics of work with Mustache JS library, prepared test data and the server in node.js. Now it’s time to code the front-end layer!
In our case we will use:
Bootstrap v3.3.5
jQuery v1.11.3
jQuery Easing v1.3 plugin
Ionicons
mustache JS
специальная оценка условий труда шум
So the next step will be the html5 page, developed on the basis of Bootstrap.
Especially please note two things — the navigation and Mustache templates.
Code part — top menu with cart on the right side:
…
<nav class="navbar navbar-default navbar-fixed-top"
role="navigation">
<div class="container">
<div class="navbar-header page-scroll">
<button type="button" class="navbar-toggle"
data-toggle="collapse"
data-target=".navbar-ex1-collapse">
<span class="sr-only">Toggle navigation</span>
<span class="icon-bar"></span>
<span class="icon-bar"></span>
<span class="icon-bar"></span>
</button>
<a class="navbar-brand page-scroll" href="#page-top">
<span class="logo-text">Code.js Food</span>
</a>
</div>
<div class="collapse navbar-collapse navbar-ex1-collapse">
<ul class="nav navbar-nav center-nav">
<li class="hidden">
<a class="page-scroll" href="#page-top"></a>
</li>
<li>
<a class="page-scroll" href="#pizza">
<span>
<i class="ionicons ion-pizza"></i>
Pizza
</span>
</a>
</li>
…
</ul>
</div>
<div class="order-preview">
<a class="page-scroll" href="#order" title="Ordered items">
<i class="glyphicon glyphicon-shopping-cart"></i>
<strong id="order-items-count">(0)</strong>
</a>
</div>
</div>
</nav>
…
As next we create individual sections.

Working application, displaying pizzas — items generated by Mustache JS
Please review the full code of the index.html page, which you can find here:
https://github.com/dominik-w/express-food-app/blob/master/index.html
Also please take a look at CSS styles available here:
https://github.com/dominik-w/express-food-app/blob/master/public/css/app.css
This file contains styles for all the elements of our project. It is worth looking at media queries, that are adapting the front-end for smaller screens:
@media(max-width:767px) {
    .center-nav {
        position: relative;
        left: 0.2em;
        width: 98%;
    }

…
It’s time to create Mustache template:
<script id="pizzas-grid" type="text/template">
<div class="col-xs-4 col-md-4 pizza-col-item">
<img class="photo-sml" src="{{img}}" title="Details: {{details}}" alt="Pizza">
<h6 class="pizza-title"><em>{{name}}</em></h6>
<div class="pizza-price">{{price_format}}</div>
<div title="Add to cart" class="pizza-add-to-cart">
<a href="javascript:pizzaApp.addPizzaToCart('{{name}}', '{{price}}', '{{index}}')">
<i class="glyphicon glyphicon-shopping-cart"></i> (+)
<span class="cart-added-blinker" id="blinker-{{index}}"> Added to cart</span>
</a>
</div>
</div>
</script>
It looks that way. We mix the code of template with placeholders, that will be substituted with real values from the processed data.
Let’s move on now to revive its entirety.
The pizza_app.js file — handling front-end
jQuery(document).ready(function ($) {

// Handle page scrolling using Easing plugin
    $(function () {
        $('a.page-scroll').bind('click', function (event) {
            var $anch = $(this);
            try {
                $('html, body').stop().animate({
                    scrollTop: $($anch.attr('href')).offset().top
                }, _scroll_speed, 'easeInOutExpo');
            } catch (e) {
                ;
            }
            event.preventDefault();
        });
    });

// Load the initial data
    pizzaApp.loadPizza();
    pizzaApp.loadDrinks();

});
At start we can see the jquery.easing based code, which defines animations for transitions between sections. Then we call the methods, that are loading the data to our menu with food and drinks. So let’s code these methods.
Loading data for menu via AJAX:
pizzaApp.loadPizza = function () {
    var url = _app_host + '/pizzas/';

    $.get(url, function () {
        // processData: false
    }).done(function (data) {
        pizzaApp.cb_loadPizza(data);
    }).fail(function () {
        $('#pizzas-items').append("A problem: cannot retrieve menu items.");
    });
};

// callback
pizzaApp.cb_loadPizza = function (data) {
    // data = JSON.parse(data);
    if (data.error > 0) {
        alert(data.msg);

        return false;
    }

    var template = $('#pizzas-grid').html();

    try {
        for (var i = 0; i < data.length; ++i) {
            var obj = data[i];

            // add extra fields - index and formatted price
            obj.index = i;
            obj.price_format = _currency + ' ' + obj.price.toFixed(2);

            var html = Mustache.to_html(template, obj);
            $('#pizzas-items').append(html);
        }
    } catch (e) {
        console.error(e);
    }
};
Right in callback function the whole Mustache JS magic happens. The template which we defined as a script with ID “pizzas-grid” is going to be processed.
The template is loaded:
var template = $('#pizzas-grid').html();
and then the final HTML output is generated and added to the website:
var html = Mustache.to_html(template, obj);
$('#pizzas-items').append(html);
In this code we also generate and insert additional, useful data.
The case of drinks is similar, but we are working with separated templates — for each drink category.
Full code available on GitHub:
https://github.com/dominik-w/express-food-app/blob/master/public/js/pizza_app.js
We will find there more methods, such as handler for “add item to cart” action:
pizzaApp.addPizzaToCart = function (name, price, idx) {

    var pizzaObj = {name: name, price: parseFloat(price)};
    shoppingCartPizzas.push(pizzaObj);

    // update items counter
    var count = shoppingCartPizzas.length + shoppingCartDrinks.length;
    $('#order-items-count').text('(' + count + ')');

    // update data in "Your order" area
    pizzaApp.rebuildOrderArea();

    // some effects on dynamic elements
    $('#blinker-' + idx).show('slow').delay(800).fadeOut(200);
    $('.order-preview').fadeTo('fast', 0.1).fadeTo('fast', 1.0);

};
This simple code adds formatted data to the virtual basket, and refreshes displayed information. Everything from simple animation effects.
Afterwards we implemented simple validation, which in case of positive result, calls the pizzaApp.submit() method:
pizzaApp.submit = function () {

    var url = _app_host + '/submit';

    // pack whole order and post to the server
    var output = {
        pizzas: shoppingCartPizzas,
        drinks: shoppingCartDrinks,
        address: shoppingCartAddress,
        total: _total
    };

    var call = $.ajax({
        type: 'POST',
        data: JSON.stringify(output),
        contentType: 'application/json',
        url: url
    });

    // callbacks
    call.fail(function (jqXHR, textStatus) {
        alert("Request failed: " + textStatus);
    });

    call.done(function (data) {
        // console.log(JSON.stringify(data));

        $("#pizza-alert-dialog").modal('show');
        $("#alert-validation-msg").html("<strong>Ready!</strong>");

        // make cleanups
        shoppingCartPizzas.length = 0;
        shoppingCartDrinks.length = 0;
        shoppingCartAddress.length = 0;
        _total = 0.0;

        $('#order-items-count').text('(0)');
        $('#submit-area').hide();
        $('#order-items').html('No items yet.');
    });

};

// Thank you
The whole order is sent using POST method, via AJAX, to node.js server, which we’ve developed in the previous part.
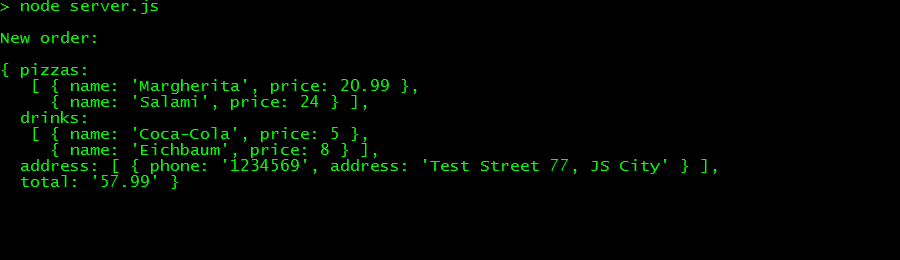
Sample order displayed in console
And that’s it — we can eat:
$ npm start
I also recommend good tutorial about the Mustache JS library:
http://coenraets.org/blog/2011/12/tutorial-html-templates-with-mustache-js
And the entire project is available on GitHub:
https://github.com/dominik-w/express-food-app
Mustache JS tutorial — summary
I urge you to analyze the entire application code. I hope this code will show you the beauty and usefulness of not only the node.js and Express framework, but also the Mustache JS library.
With this library we didn’t have to program manually the whole tedious input data processing.
Thank you for your attention and Happy Coding!
 Posted in
  Tags:
Tags: