Web storage tutorial — applications that store data locally

Today we present the tutorial about creating a simple web application, which stores data in localStorage. The app will be able to save and store the settings of its own appearance.

Web storage tutorial

1. Let’s start by adding jQuery and simple CSS styles for UI elements:

…

<script src="http://code.jquery.com/jquery-1.9.1.min.js">
</script>

<style>
#main {
  border: solid 1px #00e;
  margin: 0 auto;
  padding: 5px;
  text-align: center;
  width: 33%;
}
</style>
…

2. Create a simple form in the body section:

<body>
  <section id="main">
    <form onsubmit="javascript:storeSettings()">
      <label>Select font size: </label><br />
      <input id="your_font" type="number" max="50" min="5"
        value="14">
      <br />

      <label>Select border size: </label><br />
      <input id="your_border" type="number" max="10" min="1"
        value="1">
      <br />

      <label>Select color for background: </label><br />
      <input id="your_color" type="color" value="#ffffff">
      <br />

      <p>
        <input type="submit" value="Save settings">
        <input onclick="removeSettings()" type="reset"
          value="Remove settings">
      </p>
    </form>
  </section>
</body>

Now we can code handlers in JavaScript.

DOM Storage — JavaScript Web Storage

There is no problem with Web apps with server-side back end code, where we can for example store data in MySQL or simply — in files. Thanks to Web storage / DOM storage, our modern web application can store the data itself, and we will handle them in JavaScript.

JavaScript Web Storage

It is a part of the HTML5 specification. We understand web storage as methods and protocols for storing data locally — “in the browser”.

It’s similar to the mechanism of cookies; however, web storage provides more possibilities, including greater capacity available for our data (storage).

Cookies are available both for front (client-side) and server-side (e.g. PHP). Web storage is reserved only for client-side scripting.

Using Web Storage — JavaScript

We have local storage and session storage. The browsers with JavaScript Web storage have the sessionStorage and localStorage variables declared globally.

For sessionStorage the data are set for the duration of the session.

Example — set and get data from sessionStorage:

// set
sessionStorage.setItem('key', 'JavaScript Web Storage!');

// get
alert(sessionStorage.getItem('key'));

For localStorage it looks the same.

Merry Christmas! And some JavaScript :-)

I’d like to wish Merry Christmas for everyone, and a successful New Year!

Also I wanted to present here a few nice JavaScript effects related with Christmas.

– js1k is a challenge for developers, and here a beautiful effect of Christmas Tree:

http://js1k.com/2010-xmas/demo/856

jQuery let it snow

http://www.thepetedesign.com/demos/let_it_snow_demo.html

– snow but using Zepto.js

https://github.com/madrobby/zepto/blob/gh-pages/let-it-snow/index.html

– also beautiful DOM Tree 😀

http://hakim.se/experiments/css/domtree/

– and other nice stuff

http://demo.web3canvas.com/html5-css3/christmas-snow-falling-with-css3-jquery/

http://tympanus.net/codrops/2013/12/24/merry-christmas-with-a-bursting-gift-box/

Merry-Christmas-pic

Merry Christmas Everyone! 🙂

Read files in JavaScript and HTML5

Actually I met with this issue for years. However, the modern solutions allow us really to approach this issue in a meaningful way, not related to one specific browser.

Read files in JavaScript and HTML5

Among the easiest ways, we can mention loading the file contents via AJAX; in case of jQuery we can use the get() method:

jQuery.get('test.txt', function(data) {
  alert(data);
  // process …
  // $('#mydiv').html(data.replace('n', '<br />'));
});

On-line example:

http://dominik-w.pl/tester_file_read.html

Be aware about limitations of this method (access to files on the local file system), as well as issues related with Same-origin policy.

During the various works with HTML5 Canvas, I met with the code as shown below, which acted as it should be, and in different browsers (newer versions).

HTML5 Web Messaging

Web Messaging (or cross-document messaging) it’s the API introduced to the HTML5 specification, allowing documents from various sources / domains to communicate in a secure manner. This is the basic level of security that allows to operate over the cross-site scripting protection level.

HTML5 Web Messaging

The basic method is postMessage, allowing to establish communication. Importantly, we have to access the Window object of the target document.

A simple example:

var o = document.getElementsByTagName('iframe')[0];
o.contentWindow.postMessage('Hello!', 'http://the-site.com/');

But let’s look at specific, ready examples.

HTML5 Cache and JavaScript — how to use HTML5 cache?

Today, a few words about the issues and possibilities offered by HTML5 Cache.

Working with HTML5 Cache

The back end developers can associate it with a kind of caching the pages, to speed up their loading. In the case of HTML5 Cache it’s also about some other benefits.

HTML5 offers caching mechanism for applications in such a manner, to make an application available even without Internet connection!

The main benefits are:

– the ability to browse offline — users can use the application being offline,

– the speed — resources from the cache are loaded faster,

– server load reduction — browser will download only the changed / updated resources from the server, when will be on-line.

The base to take advantage of these opportunities is the Manifest file.

HTML5 Video and JavaScript

After an article about the audio, it’s time to write also about HTML5 Video.

Working with HTML5 Video

The <video> element of HTML5 specification allows the user to play videos in the browser without installing additional plug-ins.

Example of use:

<video controls>
 <source src="video.webm" type="video/webm">
 <source src="video.ogv" type="video/ogg">
 <source src="video.mp4" type="video/mp4">
 No video support.
</video>

As in the case of audio, we can add the controls attribute, to show the basic UI elements for video playback control.

HTML5 Audio. Sound support in HTML5 and JavaScript.

HTML5 offers us not only such wonderful elements as Canvas, but many other valuable features, facilitating the creation of on-line applications. One of them is sound support (HTML5 Audio), and additionally also video support. But the most important is that we don’t have to play around strange solutions, like Java applets; we don’t event need Flash technology.

More about HTML5 Audio

In simple words, it’s a part of HTML5 specification which allows to operate audio input, playback and sound synthesis.

It all starts with the HTML5 <audio> element.

How to use HTML5 Audio

A simple example of using audio element:

&lt;audio src=&quot;/test/myaudio.ogg&quot;&gt;
&lt;p&gt;Your browser does not support the audio element.&lt;/p&gt;
&lt;/audio&gt;

We can show the basic UI of player controls (play, volume):

&lt;audio controls&gt;
  &lt;source src=&quot;my.ogg&quot; type=&quot;audio/ogg&quot;&gt;
  &lt;source src=&quot;my.mp3&quot; type=&quot;audio/mpeg&quot;&gt;
  Your browser does not support the audio element.
&lt;/audio&gt;

It will play the supported file format or the information about the lack of audio element support in the browser.

Charts in JavaScript and HTML5

While working on various projects, sometimes we need to display the data on charts. Currently showing a chart in the browser is not a problem. We can develop own solution or take advantage of the ready-made and tested solutions.

Creating charts in JavaScript and HTML5

Let’s do a little review of the proven solutions.

jqPlot

It’s a quite simple to use plugin with large possibilities.

To run the example, we need to include scripts: jqplot.canvasTextRenderer.min.js and jqplot.canvasAxisLabelRenderer.min.js. Then we can add the JavaScript code to draw the chart:

$(document).ready(function() {
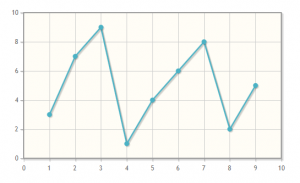
  var plot1 = $.jqplot ('chart1', [[3,7,9,1,4,6,8,2,5]]);
});

Parameters: ID of canvas element and an array of points.

jqplot-chart

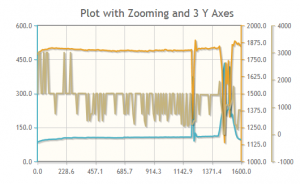
There we have, among others, line charts, bar, pie and point charts, labels for the axis and options, loading data from JSON (Ajax), zooming and more.

jqplot-chart-advanced

Documentation and more examples on the project website:

http://www.jqplot.com/docs/files/usage-txt.html

http://www.jqplot.com/tests/

Another solution, which we used successfully, is based on the Dojo framework.

HTML5 tutorial: a photo on the Canvas with clickable elements

The result of today’s work will be an effect, that may be useful in a number of projects. It’s about a kind of comment or action related with defined point on the photo. We can, for example, show detailed information after clicking in that point.

HTML5 tutorial — clickable elements on the picture

We have to keep in mind, that the configuration of clickable points is closely related with the used image.

Let’s code.

We need to create new HTML5 document, in which we include jQuery and canvas element:

<canvas id="appCanvas" width="576" height="576"></canvas>

In this example we have used 576×576 px image.

The next step is adding CSS styles, where we set our image as the background of the canvas element, and then we canter the whole:

canvas { background:url(building.jpg) }
img, canvas { display: block; border: solid 1px; margin: 1em auto; }

OK, it’s time for JavaScript code, and we start from the data array, which will be displayed when the user clicks on a particular point:

// data for "hot points"
var dataTab = {
  0: 'Here is our office',
  1: 'The level is empty!',
  2: 'Here you can find our CEO',
};

We also create the main function render(), which will contain all the necessary operations.