
Node.js itself is great. Let’s add socket.io and have possibilities, which formerly we could only dream of.
Node.js and socket.io
After presenting basics of node.js and how to work with databases, it’s time to reach for even more interesting things.
One of them certainly is socket.io. Simply establish a connection between our site (front end) and the node script, running on the server:
var socket = io.connect('//localhost:1337');
But let’s start from scratch with node.js and socket.io, step by step.
As first we can customize our configuration by adding elements necessary to work with sockets. More about basic config file you can check in the previous article.
var config = {};
config.db = {};
config.general = {}; // added

config.db.type = 'mysql';
config.db.charset = 'utf8';

config.db.username = 'user';
config.db.password = 'pass';
config.db.host = 'localhost';
config.db.dbname = 'node_tests'; // DB name

config.db.comments_tbl = 'comments';

// added
config.general.host = '//localhost'; // http://my.host.com etc
config.general.port = 1337;
config.general.debug = false; // debug mode on/off

// export
module.exports = config;
We added new configuration parameters. Today we won’t use databases; this configuration will be also useful to us in the next tutorial.
To start, we need only socket.io module. So let’s install it in our folder with code:
$ npm install socket.io
or if we want — globally”
$ npm -g install socket.io
Let’s code! We will create two simple parts — frontend and backend.
1. A HTML page
<!DOCTYPE html>
<html>
    <head>
        <title>Socket.io tests</title>

        <meta charset="utf-8">
        <meta name="viewport" content="width=device-width, initial-scale=1.0">

        <script src="https://code.jquery.com/jquery-1.11.2.min.js"></script>
        <script src="https://cdnjs.cloudflare.com/ajax/libs/socket.io/1.3.2/socket.io.min.js"></script>

        <script>
            var socket = io.connect('//localhost:1337');

            // emit some data
            socket.emit("user_online_data", {
                data: {id: 1, name: "Tester", msg: "Hello!"}
            });

            // handle our events
            socket.on('welcome', function (data) {
                // process data from node script
                $('#messages').append('<li>' + data.message + '</li>');

                // emit data to node script
                socket.emit("sayhi", {
                    data: 'Hi node!'
                });
            });

            // another "event" we named "time"
            socket.on('time', function (data) {
                console.log(data);
                $('#messages').append('<li>' + data.time + '</li>');
            });

            // if someting went wront and node script sent error data
            socket.on('error', function () {
                console.error(arguments);
            });
        </script>
    </head>

    <body>
        <ul id="messages"></ul>
    </body>

</html>
The code from this file we can simply run in the browser, but this in a moment. We’ll also discuss whole code.
We still need the code working on the server side.
2. Node.js script (server) — test.js
/*
 * node.js and socket.io tests
 */

var http = require('http'),
    fs = require('fs'),
    index = fs.readFileSync(__dirname + '/index.html');

// setup
var config = require('./config.js');
var PORT = config.general.port;
var HOST = config.general.host;

// send html content to all requests
var app = http.createServer(function (req, res) {
    res.writeHead(200, {'Content-Type': 'text/html'});
    res.end(index);
});

// socket.io server is listening …
var io = require('socket.io').listen(app);

// sample function:
// send current time to all connected clients
function sendTime() {
    io.sockets.emit('time', {
        time: new Date().toJSON()
    });
}

// send current time every 10 secs
setInterval(sendTime, 10000);

// emit welcome message on connection
io.sockets.on('connection', function (socket) {
    socket.user_id = 0; // current user ID

    socket.emit('welcome', {message: 'Welcome!'});

    socket.on('sayhi', console.log); // just log data in console

    // process the data
    socket.on('user_online_data', function (data) {
        socket.user_id = data.mydata.id; // "socket scope"

        var name = data.mydata.name; // local scope
        console.log("#:" + socket.user_id + ", name: " + name);
    });
});

app.listen(PORT);

console.log('Server running at ' + HOST + ':' + PORT + '/');
// console.log('Debug: ' + config.main.debug);
We assume that both files are located in the same folder. In this way, the node server which we just wrote, will serve us content of our web page (index.html) via WWW. It happens in the line:
…
    index = fs.readFileSync(__dirname + '/index.html');
Assuming we have the socket.io module already installed (npm install socket.io), we can start our server.
Open command line, go to folder with code and run test.js script:
$ node test.js
Then simply open in web browser our web page (remember about the port), e.g.:
http://localhost:1337/
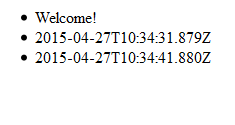
Now we should see served page, which will be updated every 10 seconds by data from our node.js server:
And in the console we should see the data sent from the client:
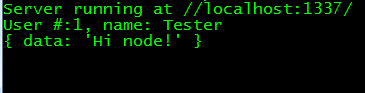
Clean, efficient communication and data exchange. That’s the beauty of node.js and socket.io!
What happens in the code
We used here basic elements necessary for efficient work with node.js and socket.io. Let’s discus them in sequence.
The index.html file
As first we add necessary libraries: socket.io.min.js and additionally — jQuery.
After connecting we go to the proper communication. Note: to connect properly remember about the port (for the code on client- and server- side must be the same).
We send the data using method emit as: socket.emit(“key_name”, { data });
In the further lines we handle the case of sending “welcome” message by the server:
socket.on('welcome', function (data) { …
The next event we handle, is displaying detailed information about current time, send by the server every 10 seconds. This of course only something for demonstration:
…
socket.on('time', function (data) {
  console.log(data);
  $('#messages').append('<li>' + data.time + '</li>');
});
…
Now let’s talk about sever-side code
Server — test.js
The first thing here is “set up” of necessary modules:
var http = require('http'),
    fs = require('fs'),
    index = fs.readFileSync(__dirname + '/index.html');
The last line reads our index.html file, to serve content on the port configured for our server (here: 1337).
Certainly we don’t have to do it; usually when we develop web application, we have a separated code (e.g. based on PHP MVC framework). So the code for communication through socket.io we place e.g. in template of particular web page.
Then it’s enough to serve anything, e.g.:
var http = require('http'),
  index = "<html><body>Listening …</body></html>";
Next operation in our code is to get settings and create the server.
Then we have the sendTime() function, called every 10 secs, which emits data — here the object with current date — as JSON.
And we go to the block of code that handles communication:
io.sockets.on('connection', function (socket) {
…
In case of successful socket.io connection, the code from this block will be executed. In our case it’s:
– send “welcome” message:
socket.emit('welcome', {message: 'Welcome!'});
– handle the “sayhi” event, emitted on client side:
socket.on('sayhi', console.log);
– at the end something more interesting — processing received data :
socket.on('user_online_data', function (data) {
  socket.user_id = data.mydata.id; // "socket scope"

  var name = data.mydata.name; // local scope
    console.log("User #:" + socket.user_id + ", name: " + name);
});
As we see, getting the data is very simple. We could also pay attention to the local variable (var) and a variable “within” the socket. For example when we want to use value of current user ID, in current connection, we can assign this value for the socket (socket.user_id = data.mydata.id).
Connection broken, disconnection
When we have our page opened in the browser, and we terminate server-side script (CTRL + C in console), certainly communication errors will occur.
Opening e.g. Firebug, we will see the failed calls:
![]()
There are many attempts of reconnection. To limit this, simply change the line responsible for connection:
var socket = io.connect('//localhost:1337', {reconnection: false});
This will block attempts of reconnection.
Additionally, to handle disconnection case (e.g. user closed browser window) on server side, we use the disconnect event:
…
socket.on('disconnect', function() {
  if (socket.user_id > 0) {
    // if (config.general.debug) { console.log('Bye #: ' + socket.user_id); }
    // do some cleanups …
  }
});
Full code of an example available here:
https://github.com/dominik-w/js_html5_com/tree/master/node-socket-io-tutorial
We talked here about basic elements, on which we can build our solutions based on node and socket.io. The next tutorial will be with practical example — real time comments implementation.
Node.js and socket.io — summary
Well — these are great technologies, what we should notice in today’s examples. Although it was still only basic information.
I also encourage you to check the documentation of socket.io:
Thank you!
 Posted in
  Tags:
Tags:
io.connect is not defined.