Some time ago I decided to write a simple application to backup files quickly, and place them on my server. I created with program using Adobe AIR (and PHP for a small backend).
Adobe AIR tutorial — creating a real application
We will read here, among others, about Drag&Drop, communication with the server, and handle the files in Adobe AIR.
Source code as Aptana project and final .air file for download here.
Basic requirements for application
The project had the following guidelines:
– application for backup files,
– nice little window that you can drag,
– select files by drag&drop,
– at once we can send a specified number of files,
– the ‘upload’ button sends files to the server,
– at the server-side files are received by PHP script, with automatic names management,
– after sending the files, application will clean and prepare buffers for the new package of files.
We start creating Adobe AIR project
Create a new Adobe AIR project in Aptana.
Relevant here are the window settings, because we want to style it with CSS. Therefore, we set the Window Options:
– in Window Style choose the Custom Chrome (transparent)
– width and height: 550 x 350
In the “Select Ajax Libraries” section we choose jQuery.
We add the following files to the project:
– css/style.css
– icons/ajax_s.gif
– lib/myapp.js
– processor.php
The structure of the project looks now as follows:
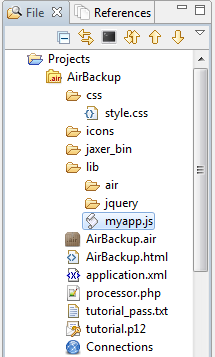
Adobe AIR tutorial
Now let’s open the AirBackup.html file, and in the head section we include files:
– lib/myapp.js
– css/style.css
We should also add a meta tag that specifies the encoding — the same as we use in Aptana’s editor. I always and everywhere use utf-8. Especially I work with application available in many languages. UTF-8 just simplifies the matter.
OK, now let’s create user interface in body section:
<body>
  <div id="my-window">
    <div id="top-bar">
      <span id="app-label">
        AirBackup 1.1 by javascript-html5-tutorial.pl
      </span>
      <a href="#" id="app-close">X</a>
    </div>

    <div id="drop-area"
      ondragenter="handleDragEnter(event);"
      ondragover="handleDragOver(event);"
      ondrop="handleDrop(event);">
        Proszę przeciągnąć pliki na ten obszar
    </div>

    <div id="files">
      <ul></ul>
    </div>

    <span onclick="startUpload()" id="control-area">
      <img src="icons/AIRApp_32.png"
          style="vertical-align: middle;" />
      Wyślij
    </span>

    <div id="progress_pointer" style="display: none;">
      Przetwarzanie…<img src="icons/ajax_s.gif" />
    </div>

    <div class="clear"></div>
  </div>
</body>
An element (id=”top-bar”) is the title bar of the window, drop-area is an area, where the user will drop their files. We also have the loading indicator, typical for Ajax applications.
Note the events from drop-area:
ondragenter="handleDragEnter(event);"
ondragover="handleDragOver(event);"
ondrop="handleDrop(event);"
There are handlers assigned, and code of them is placed in lib/myapp.js file. Simplicity of implementation is just incredible.
We have to define CSS styles, to display window properly and make it user friendly:
css/style.css:
/*
 * CSS for AirBackup 1.0
 * (c) javascript-html5-tutorial.pl
 */

.clear {
    clear: both;
}

#my-window {
    width: 540px;
    height: 340px;
    background-color: #fff;
    border: 1px outset #00d;
    overflow: hidden;
    -webkit-border-radius: 10px;
}

#app-label {
    float: left;
    padding: 4px;
    cursor: move;
}

#top-bar {
    height: 30px;
    border-bottom: 1px solid #00a;
    text-align: right;
    padding: 2px 8px 0 4px;
    cursor: move;
}

#top-bar a {
    font-weight: bold;
    color: #f00;
    text-decoration: none;
    line-height: 30px;
}

#files {
    list-style-type: square;
    float: left;
    width: 300px;
    height: 200px;
    overflow: auto;
    padding: 5px;
    font-size: 9px;
}

#drop-area {
    float: left;
    width: 500px;
    height: 90px;
    border: 1px solid #00d;
    background-color: #efe;
    margin: 10px;
    padding-top: 10px;
    padding-left: 10px;
    font-size: 8pt;
}

#control-area {
    cursor: pointer;
    float: right;
    padding: 10px
}

#info {
    padding: 8px 0 4px 8px;
    font-size: 9pt;
}
Let’s cut to the chase — myapp.js
It’s a main JavaScript file, with the application functions implementation.
Config section:
// target url
const SERVER_URL = "http://www.directcode.eu/airbackup/processor.php";

// max files per one queue
const FILES_MAX_AMOUNT = 10;
It’s very important to set correct path in the SERVER_URL. It should point to our processing script on our server. This PHP script (I will present it in a moment) receives and stores files sent by the user.
Note: a real script from my examples (http://www.directcode.eu/airbackup/processor.php) is disabled because of security reasons.
Now, let’s add little bit of jQuery code to handle our window:
$(document).ready(function() {
    // D&D
    $("#top-bar").mousedown(function() {
        window.nativeWindow.startMove();
    });

    // exit the app
    $("#app-close").click(function() {
        window.nativeWindow.close();
        return false;
    });
});
As next, we define global arrays:
// files
var backupFileNames = new Array();

// objects
var backupFiles = new Array();
and event handlers:
function handleDragEnter(event) {
    event.preventDefault();
}

function handleDragOver(event) {
    event.preventDefault();
}

function handleDrop(event) {

    // control amount of files
    if (backupFiles.length >= FILES_MAX_AMOUNT) {
        alert('Wyślij bieżące pliki. Limit 1 pakietu wynosi '
            + FILES_MAX_AMOUNT);

        return;
    }

    // build files list
    var fileList = event.dataTransfer.getData(air.
        ClipboardFormats.FILE_LIST_FORMAT);

    for (var i in fileList) {
        if ($.inArray(fileList[i].name, backupFileNames) == -1)
        {
            backupFileNames.push(fileList[i].name);
            backupFiles.push(fileList[i]);
            $("#files ul").append('<li>' + fileList[i].name + '</li>');
        }
    }

    showFilesInfo();
}
And we implement additional functions:
// show information about files
function showFilesInfo() {
    if ($("#info").length == 0) {
        $("#top-bar").after('<div id="info"></div>');
    }
    else {
        $("#info").empty();
    }

    var _size = getTotalFileSize() / 1024; // kB

    // formatuj do 2 miejsc po przecinku
    var _formatted_size = (Math.floor(_size * 100)) / 100;

    $("#info")
        .append("Liczba plików: " + backupFiles.length + "<br />")
        .append("Sumaryczny rozmiar plików: "
            + _formatted_size + " kB");
}

// calculate the size of files
function getTotalFileSize() {
    var sum = 0;

    for (var i in backupFiles) {
        sum += backupFiles[i].size;
    }

    return sum;
}

// cleaning up
function doCleanups() {
    $("#progress_pointer").hide();

    backupFileNames = [];
    backupFiles = [];

    $("#files").empty();
    $("#info").empty();
}
And the main point:
// uploading files to the server
function startUpload() {

    if (backupFiles.length == 0) {
        alert('Brak plików do wysłania na serwer.');
        return;
    }

    var boundary = '--AaB03x';
    var request = null;
    var file = null;

    // nowe żądanie
    request = new air.URLRequest(SERVER_URL);

    request.useCache = false;
    request.contentType = 'multipart/form-data, boundary='
        + boundary;
    request.method = 'POST';

    var buffer = new air.ByteArray();

    // pokaż indicator
    $("#progress_pointer").show();

    // przetwórz listę plików
    for (x in backupFiles) {

        file = new air.File(backupFiles[x].nativePath);

        fileStream = new air.FileStream();
        fileStream.open(file, air.FileMode.READ);
        fileContents = new air.ByteArray();
        fileStream.readBytes(fileContents, 0, file.size);
        fileStream.close();

        buffer.writeUTFBytes("--" + boundary + "\r\n");
        buffer.writeUTFBytes("content-disposition: form-data;
             name=\"Filedata\"; filename=\"" + file.name
        + "\"\r\n");

        buffer.writeUTFBytes("Content-Transfer-Encoding: binary\r\n");
        buffer.writeUTFBytes("Content-Length: " + file.size + "\r\n");
        buffer.writeUTFBytes("Content-Type: application/octet-stream\r\n");
        buffer.writeUTFBytes("\r\n");

        buffer.writeBytes(fileContents, 0, fileContents.length);
        buffer.writeUTFBytes("\r\n--" + boundary + "--\r\n");

        request.data = buffer;

        var loader = new air.URLLoader();

        loader.addEventListener(air.ProgressEvent.PROGRESS,
        function(e) {
           // alert('progress: ' + e);
        });

        loader.addEventListener(air.IOErrorEvent.IO_ERROR,
        function(e) {
            alert('error: ' + e.text);
        });

        loader.addEventListener(air.Event.COMPLETE, function(e) {
            if (loader.data) {
                alert(loader.data);
                doCleanups();
            }
        });

        loader.load(request);
    }
}
That’s (almost) all, we can run our desktop application.
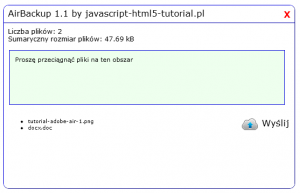
Adobe AIR tutorial — app window
I choose the same files two times, so on the server I have copies of my files already:
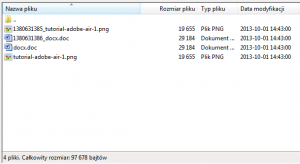
Adobe AIR tutorial — files
And now let’s complete the PHP script
It’s the simplest version. Handles the uploaded files, and additionally contains a code that adds a timestamp to the file name if one does not already exist, so we don’t overwrite files:
    // processor.php

    // this folder must exist and be writable by the script
    $upload_dir = "./uploads/";

    $err_state = true;

    $temp_file = $_FILES['Filedata']['tmp_name'];
    $file_name = $_FILES['Filedata']['name'];
    $file_size = $_FILES['Filedata']['size'];

    // add the UNIX Timestamp as prefix if such file exists
    $tmp_file_name = "";
    if (file_exists($upload_dir . $file_name)) {
        $tmp_file_name = time() . '_' . $file_name;

        if (move_uploaded_file($temp_file, $upload_dir
            . $tmp_file_name)) {
            $err_state = false;
            // …
        }
    }
    else {
        if (move_uploaded_file($temp_file, $upload_dir
        . $file_name)) {
            $err_state = false;
            // …
        }
    }

    if (!$err_state) {
        // success
        echo "Sukces: przechwycono i zabezpieczono pliki.";
    } else {
        echo "Error: upload nie powiodl sie.";
    }
To overwrite files (if we to keep only the newest files), remove the following code:
$tmp_file_name = "";
if (file_exists($upload_dir . $file_name)) {
    $tmp_file_name = time() . '_' . $file_name;

    if (move_uploaded_file($temp_file, $upload_dir
    . $tmp_file_name)) {
        $err_state = false;
        // …
    }
}
else {
    if (move_uploaded_file($temp_file, $upload_dir
    . $file_name)) {
        $err_state = false;
        // …
    }
}
and simply write:
if (move_uploaded_file($temp_file, $upload_dir . $file_name)) {
    $err_state = false;
    // …
}
And it’s ready. The design guidelines have been met.
Summary
Thus, we have learned some interesting issues regarding Adobe AIR, and we have a pretty useful application. I use it myself, because making copies of important files on the server is very important to me. And now I can do it even faster.
Sources available here.
Thank you.
 Posted in
  Tags:
Tags: