Angular in practice! Today we have a small AngularJS tutorial, about creating small UI connected with dynamically created (refreshed) graphical object.
AngularJS Tutorial — control an element with Angular
In the basic course of Angular, we focused on information. Now it’s time to see it in a real example. Today’s simple tutorial in small steps will help us with this.
Step 1.
Let’s create HTML5 document and include AngularJS library.
Step 2.
Define an element, on which we will operate from the level of UI. In our example we will create a simple element using CSS:
.my-elem {
  background: #00c;
  border-radius: 10%;
  position: absolute;
  width: 200px;
  height: 200px;
  max-width: 500px;
  max-height: 500px;

  /* speed */
  transition: 0.8s;
  -webkit-transition: 0.8s;

  /* init pos*/
  left: 100px;
  top: 200px;
}
Step 3.
With the help of HTML5 we will create “range” inputs, which will be bind-ed with our element through Angular:
…
  <body ng-app="app">
    <div class="ng-scope" ng-controller="TutController">

      <label>dX:</label>
      <input value="10" ng-model="object.pos.x"
        ng-change="changeStyle(object)"
        min="1" max="500" type="range"><br>

      <label>dY:</label>
      <input value="10" ng-model="object.pos.y"
        ng-change="changeStyle(object)" min="1"
        max="200" type="range"><br>

      <label>Size:</label>
      <input value="150" ng-model="object.size"
        ng-change="changeStyle(object)"
        min="1" max="500" type="range"><br>

      <p class="ng-binding" debug-position="">Adjust the ranges</p>

      <div id="container">
          <div id="my-elem" class="my-elem"
            ng-style="style(object)">
          </div>
      </div>

    </div>
  </body>
…
There are 3 inputs to control following parameters:
– position X
– position Y
– the size of an element
Step 4.
Now let’s write little bit of JavaScript code. We should know it well: define an application and controller. In the controller’s scope we define two methods:
– returning current style of an element
– changing the style of an element depending on the UI changes.
Everything of course connected and handled thanks to AngularJS.
var app = angular.module('app', []);

app.controller("TutController", function ($scope) {
    $scope.object = {
      pos: {
        x: 5,
        y: 5
      },
      size: 150,
      style: {}
    };

    // return the object with current styles
    $scope.style = function (object) {
      return object.style;
    };

    // update styles depending on UI inputs state
    $scope.changeStyle = function (object) {
      object.style = {
        'width': object.size + 'px',
        'height': object.size + 'px',
        'left': object.pos.x + 'px',
        'top': parseInt(object.pos.y) + 200 + 'px'
      };
    };

    // …
});
Actually that’s all! Data binding will handle of updating the appearance of an element depending on UI elements state.
Additionally, we can write a simple directive, wich will show us some debug info:
// …
app.directive('debugPosition', function () {
  return {
    template: '<strong>Debug:</strong><br> dX: {{object.pos.x}}
    <br>
    dY: {{object.pos.y}}
    <br>
    Size: {{object.size}}',
    };
});
Please pay attention on using this directive (name) in HTML code:
<p class="ng-binding" debug-position="">Adjust the ranges</p>
A sample view:
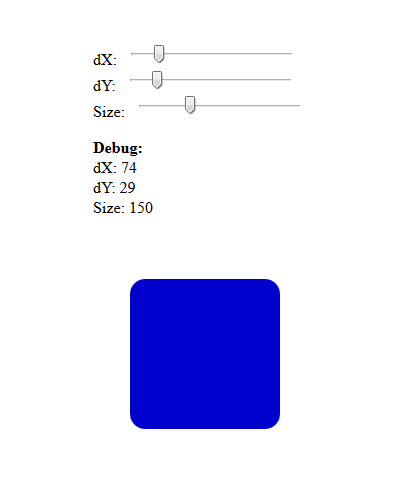
AngularJS tutorial — an example
Source available on GitHub:
https://github.com/dominik-w/angularjs/tree/master/angular-ui-tutorial
AngularJS Tutorial — Summary
Few small steps: adding UI input elements and little bit of JS code and Angular directives, and our small application is ready.
Happy coding!
 Posted in
  Tags:
Tags: