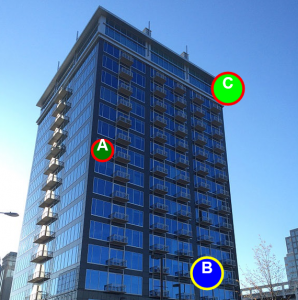
The result of today’s work will be an effect, that may be useful in a number of projects. It’s about a kind of comment or action related with defined point on the photo. We can, for example, show detailed information after clicking in that point.
HTML5 tutorial — clickable elements on the picture
We have to keep in mind, that the configuration of clickable points is closely related with the used image.
Let’s code.
We need to create new HTML5 document, in which we include jQuery and canvas element:
<canvas id="appCanvas" width="576" height="576"></canvas>
In this example we have used 576×576 px image.
The next step is adding CSS styles, where we set our image as the background of the canvas element, and then we canter the whole:
canvas { background:url(building.jpg) }
img, canvas { display: block; border: solid 1px; margin: 1em auto; }
OK, it’s time for JavaScript code, and we start from the data array, which will be displayed when the user clicks on a particular point:
// data for "hot points"
var dataTab = {
  0: 'Here is our office',
  1: 'The level is empty!',
  2: 'Here you can find our CEO',
};
We also create the main function render(), which will contain all the necessary operations.
These operations are for example creating circles in particular points of image, by function:
var theCircle = function(x, y, radius) {
  this.left = x - radius;
  this.top = y - radius;
  this.right = x + radius;
  this.bottom = y + radius;
};
We will also add further functions:
– draw, which performs the appropriate drawing using HTML5 Canvas methods such as arc(), to draw circles,
– drawCircle, which will call the draw() function, and add drawn circles to the collection (circles array).
Then we can implement drawing circles at specified points, for example:
drawCircle(context, 200, canvas.height / 2, "green", 20, 5, "#f00",
    "#fff", "center", "bold 30px Arial", "A", circles);
A sample result:

Parameters of the function are: context, x, y, fillcolor, radius, linewidth, strokestyle, fontcolor, textalign, fonttype, filltext, circles.
Now we only need to add click handler:
$('#appCanvas').click(function (e) {
  var clickX = e.pageX - this.offsetLeft;
  var clickY = e.pageY - this.offsetTop;

  for (var i = 0; i < circles.length; i++) {
    if (clickX < circles[i].right && clickX > circles[i].left
      && clickY > circles[i].top && clickY < circles[i].bottom) {
      // alert('You clicked: ' + (i + 1));
      alert(dataTab[i]);
    }
  }
});
This can be any action; in our example it displays a message with information related to clicked point (we could say “a virtual element”).
And it’s done, our complete example available on-line:
http://directcode.eu/samples/html5_tutorial_canvas_photo_hints/index.html
and on GitHub:
https://github.com/dominik-w/js_html5_com/tree/master/html5_tutorial_canvas_photo_hints
Summary
The effect can be used in various projects, only limited by our imagination. Using
HTML5 Canvas with a little bit of JavaScript is a great solution for such a task. And the code can be easily expanded.
Thank you and have fun!

 Posted in
  Tags:
Tags: 

[…] https://javascript-html5-tutorial.com/html5-tutorial-a-photo-on-the-canvas-with-clickable-elements.html; […]
Thanks for the tutorial!
I further enhanced it a bit, adding mouse move tracking and redirection to other webpages once clicking on the elements. The resulting code is here, maybe will be of use for someone: https://github.com/mlukjanska/js-examples#example-1-a-map-image-with-html5-canvas-and-clickable-elements-that-redirect-to-other-webpages
Thanks, that’s cool!