HTML5 short course. Part 2 — summary.

In the second, summary part of the basic course HTML5, we look closely at the next great elements of the language.

HTML5 short course: the Modernizr library

At the beginning we add yourself to facilitate work in the form of the Modernizr library.

This is a JavaScript library that detects the availability of HTML5 and CSS3 features in our browser.

We can download the Modernizr from official website, where is also a tool allowing us to choose the test only for those features, that interests us. Ad by the way we can see a full list of features, that Modernizr can detect.

We may also use the CDN, such as cdnjs.com.

So let’s add the library to our project:

<script src="modernizr.js" type="text/javascript"></script>

And add the no-js class to our main markup (html):

<html class="no-js">
…

Modernizr runs automatically, so you can immediately use it, for example, to check whether the browser supports the Canvas element:

if (Modernizr.canvas) {
  // let's draw!
} else {
  // no native canvas support available
}

As we can see, the tests performed by Modernizr allows not only for instant detect the availability of the required functionality, but also the implementation of an alternative for browsers without support for desired feature.

Actions that the above code executes, we can also write manually in JavaScript:

function supports_canvas() {
  return !!document.createElement('canvas').getContext;
}

But I prefer the Modernizr’s way.

Please note that Modernizr is not a library that adds missing functionality to the browser.

There is some kind of such solution — the html5shiv library, which may add support for some HTML5 elements in IE9+.

HTML5 short course — part 1

Welcome to HTML5 short course — in a nutshell. We tried to prepare a quick course about HTML5 (and the use of JavaScript in its context), containing key information in one place. The case was somewhat complicated by the fact that the subject is quite extensive. But we can handle!

HTML5 short course

HTML5 is an extension of HTML 4 and XHTML 1 variant, and it is a competitive specification in relation to the XHTML 2, whose development was abandoned in favor of HTML5 support.

The language introduces many new elements comparing to its older older counterparts, among others:

new tags, such as article, header, footer, nav, video, audio, mark, progress, section;

new types of form fields: color, email, datetime-local, datetime, date, month, week, time, number, range, tel, search, url;

new attributes of form elements: autofocus, required, autocomplete, min, max, multiple, pattern, step.

The programmer gets lots of facilities for programming the UI.

There are also news concerning the API:

– 2D drawing with the new element — Canvas,

– drag and drop API, with the draggable attribute,

– audio and video playing API,

– editing API with the contenteditable attribute,

– API for offline applications,

– storage API (memory) — local

– geolocation, microdata and other.

There are also new DOM methods:

– activeElement()

– hasFocus()

– getElementsByClassName()

– getSelection()

– classList()

– relList() — for the ‘a’ html element

– innerHTML() — for window and document

In addition, the HTML5 specification focuses on errors handling.

Browsers that support HTML5 will be adapted to handle errors in syntax. HTML5 is designed so that older browsers could easily ignore the new constructions.

We believe that HTML5 is a great technology with amazing possibilities and potential, also on mobile devices.

Speaking of devices, let’s mention about meta viewport.

Meta viewport and HTML5 on mobile devices

Viewport tag defines the page display on mobile devices; allows to set scaling options or default zoom. Like other meta tags, too, and this is placed in the HEAD section.

Example:

&lt;meta name=&quot;viewport&quot; content=&quot;width=device-width, initial-scale=1&quot;&gt;

It is enough, but the meta viewport we should use in case of creating layout version for mobile or responsive website (RWD).

HTML5 Canvas and JavaScript. Introduction.

Introduction to HTML5 we start by one of the most important elements, namely HTML5 Canvas.

We’ll talk briefly about programming in JavaScript in the context of the Canvas element (and other elements in further articles).

HTML5 Canvas

HTML5 gives us many new opportunities, including the new Canvas element, which is part of the HTML5 specification.

This element is something like the environment to create dynamic graphics, rendering shapes and bitmap images, or graphics operations.

Graphics is created using JavaScript codes, and thanks to HTML5 Canvas became possible to create animations and games running in browsers, without additional plug-ins.

Let’s move on to the code. The following example shows a basic HTML5 document.

Example:


<!doctype html>
<html>
<head>
  <meta charset="utf-8">
  <title>HTML5 Basics</title>

</head>
<body>
  <p>Hello HTML5</p>

</body>
</html>

Basics of the HTML5 Canvas

To create a Canvas element, we use the appropriate tag. And we should set the dimensions (default 300×150 px).

Example:

<canvas id="example" width="400" height="200">
  This text will be displayed if the browser does not
  supports HTML5 Canvas.
</canvas>

If we give some content between the opening and closing tags, this text will be displayed in browsers without HTML5 Canvas element support.

It’s practically everything when it comes to creating the same Canvas element in HTML5. The rest — proper drawing — is done in JavaScript.

HTML5 Canvas API

The first thing we should do is to refer to the Canvas element and its context (API):

var canvas = document.getElementById('test');
var context = canvas.getContext('2d');

And now we can draw in two-dimensional space of HTML5 Canvas.

It is also worth mentioning that coordinates in HTML5 Canvas start at the top left corner — the 0.0 point is here.

jQuery tutorial: own tooltips

Today we recommend the jQuery tutorial, that shows how to create own ToolTips. In four easy steps.

jQuery tutorial — creating own tooltips

Source available: here.

Step 1 — the project

Create a new project (e.g. in Aptana IDE) or simply create a structure as below:

Tutorial jQuery — tooltip

Step 2 — the view

We create the basic look, assuming that the tooltip element will be “span”:

style.css:

span#own-tooltip {
    height: 20px;
    position: absolute;
    top: 100px;
    left: 100px;
    border: 2px solid #00f;
    background-color: #fff;
    color: #00f;
    padding: 4px;
    display: none;
}

Appearance can be adapted freely by changing the CSS presented above.

Step 3 — HTML structure

We create HTML structure. In my case, I wanted tooltips for links, so the text for the tooltip is gathered from “title” attribute of an element.

For example:

<div id="main-place">
  <a href="http://www.javascript-html5-tutorial.com/"
    title="JavaScript and HTML5 blog">Link 1</a>

  <a href="http://www.google.pl/"
    title="Link to Google">Link 2</a>

  <a href="http://www.odesk.com/"
    title="Odesk">Link 3</a>
</div>

Step 4 — JavaScript / jQuery code

We code everything in JS using jQuery.

The things to do are:

– adding tooltip element to DOM

– traverse all elements for which we want to show tooltip

– set the position and the text for tooltip, display tooltip

– optionally we can add some visual effects

Adobe AIR tutorial: an application to backup files on the server

Some time ago I decided to write a simple application to backup files quickly, and place them on my server. I created with program using Adobe AIR (and PHP for a small backend).

Adobe AIR tutorial — creating a real application

We will read here, among others, about Drag&Drop, communication with the server, and handle the files in Adobe AIR.

Source code as Aptana project and final .air file for download here.

Basic requirements for application

The project had the following guidelines:

– application for backup files,

– nice little window that you can drag,

– select files by drag&drop,

– at once we can send a specified number of files,

– the ‘upload’ button sends files to the server,

– at the server-side files are received by PHP script, with automatic names management,

– after sending the files, application will clean and prepare buffers for the new package of files.

We start creating Adobe AIR project

Create a new Adobe AIR project in Aptana.

Relevant here are the window settings, because we want to style it with CSS. Therefore, we set the Window Options:

– in Window Style choose the Custom Chrome (transparent)

– width and height: 550 x 350

In the “Select Ajax Libraries” section we choose jQuery.

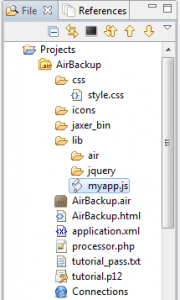
We add the following files to the project:

– css/style.css

– icons/ajax_s.gif

– lib/myapp.js

– processor.php

The structure of the project looks now as follows:

Adobe AIR tutorial

Adobe AIR tutorial

Now let’s open the AirBackup.html file, and in the head section we include files:

– lib/myapp.js

– css/style.css

We should also add a meta tag that specifies the encoding — the same as we use in Aptana’s editor. I always and everywhere use utf-8. Especially I work with application available in many languages. UTF-8 just simplifies the matter.

OK, now let’s create user interface in body section:

<body>
  <div id="my-window">
    <div id="top-bar">
      <span id="app-label">
        AirBackup 1.1 by javascript-html5-tutorial.pl
      </span>
      <a href="#" id="app-close">X</a>
    </div>

    <div id="drop-area"
      ondragenter="handleDragEnter(event);"
      ondragover="handleDragOver(event);"
      ondrop="handleDrop(event);">
        Proszę przeciągnąć pliki na ten obszar
    </div>

    <div id="files">
      <ul></ul>
    </div>

    <span onclick="startUpload()" id="control-area">
      <img src="icons/AIRApp_32.png"
          style="vertical-align: middle;" />
      Wyślij
    </span>

    <div id="progress_pointer" style="display: none;">
      Przetwarzanie…<img src="icons/ajax_s.gif" />
    </div>

    <div class="clear"></div>
  </div>
</body>

An element (id=”top-bar”) is the title bar of the window, drop-area is an area, where the user will drop their files. We also have the loading indicator, typical for Ajax applications.

We explore Adobe AIR. Windows, menus, XHR.

Previously we talked about Adobe AIR basics, including preparation of development environment. It’s time for the next article, and more practice.

We will work with windows and XHR calls (yes, we can enjoy AJAX in AIR apps).

Working with windows in Adobe AIR

Creating a window looks exactly the same as it is in classic JavaScript.

Example — creating a window in Adobe AIR:

function createWindow() {
    window.open("content.html", "MyWin", "height=300, width=300");
}
createWindow();

Adobe AIR goes a step further, giving us the Native Windows, with customization possibility.

Example:

function createNativeWindow() {
    // windows options
    var options = new air.NativeWindowInitOptions();

    // the window size and position:
    var rect = new air.Rectangle(20, 20, 300, 250);

    // create a new window:
    popup = air.HTMLLoader.createRootWindow(true,
        options, false, rect);

    // load the content:
    var page = air.File.applicationDirectory
        .resolvePath('content.html');

    popup.load(new air.URLRequest(page.url));
}
createNativeWindow();

We can customize the window options using dedicated methods; this example shows how to read the contents of an external file (content.html).

By the way, we can see how the reference to file system in AIR looks:

var page = air.File.applicationDirectory
   .resolvePath('content.html');

popup.load(new air.URLRequest(page.url));

Customizing buttons of the window

One of many possibilities is to define our own window control buttons (min, max, close).

Adobe AIR tutorial — an introduction and first application

Adobe AIR — quick start

In this article I want to provide a quick start with the Adobe AIR technology. It’s the next reason to learn JavaScript and improve our knowledge about this language and related technologies.

Adobe AIR (Adobe Integrated Runtime) it’s a runtime environment for RIA apps, which can be developed in Adobe Flex / Flash or using HTML, CSS, JavaScript / AJAX.

It’s a multi-platform tool. With this we can create portable desktop applications for Microsoft Windows, Linux, Mac OS, and even mobile operating systems.

AIR applications have a lot of possibilities, such as: access to the local file system, support local SQLite database, communication with the server using sockets, audio support and clipboard, and much, much more.

All these functionalities are accessible from JavaScript language level. By adding HTML and CSS it’s enough for us to create a fully-fledged desktop applications.

With the approach of using Action Script, we have even more possibilities, especially in GUI development. However, we will focus here on JavaScript approach only.

Adobe AIR in practice

At the outset, we must do two things.

1. Download and install the runtime environment for our OS:

http://get.adobe.com/air/

After setup we are ready to run AIR applications in our system. As developers, we want to write something, so:

2. Get and install SDK:

http://www.adobe.com

Then next thing (not obligatory, because we can work with any text editor and command line) is IDE. In this case I definitely recommend here the Aptana Studio (but version 2.x with AIR support).

This IDE is free, after installing few plug-ins it’s ready to develop, build and run AIR applications.

Another option is an extension for Dreamweaver, but here we focus on Aptana.

Aptana for Adobe AIR

Let’s download the Aptana Studio, BUT the 2.x version (not 3.x). At least for now, there’s no Adobe AIR support in 3.x.

However, nothing prevents us to have both versions of the IDE in our system. For my own example: I use Aptana 3 for HTML5 projects, but for the purposes of Adobe AIR projects (and this tutorial), I have also Aptana 2.0.5.

http://aptana.com/products/studio2/download

It is possible to download standalone version (I chose this option), or as Eclipse plug-in.

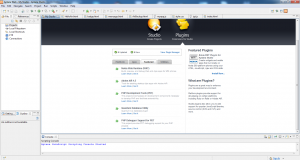
After starting we see Aptana’s home tab. Let’s click in plugins, and if it’s a fresh installation of Aptana, probably we have to install manually an extension for AIR support. It should be on the list, e.g.: Adobe AIR 1.5 in the Featured tab.

Just click Get it and finish setup process.

Aptana Adobe AIR

Aptana

After restart we can code!

Settings and basic certificates

In Window -> Preferences -> Aptana -> AIR SDKs we can set a path to the SDK and indicate it as the default.

We also recommend to set basic options for application certificates.

Welcome (and we are back) after small break

Welcome back after more than a month break!

But the reason is not a laziness. Quite the contrary. I’ve been busy with development of my own small IT company (DirectCode).

It costs a lot of time and energy. There is still a lot to do, but the company is at a slightly higher level than before.

DirectCode

DirectCode

I also finished DirectCode’s new office! Home-office is great, but not at this level.

Anyway, despite the greater amount of duties and responsibilities, I will try to post new articles at least once a week. There is still so much interesting topics!

Btw. we changed commenting system. It is based on the Disqus solution.

Greetings

JavaScript file

PHP functions in JavaScript — the php.js library

In this short article we want to present a very interesting library — php.js.

PHP functions in JavaScript thanks to the php.js library

The library allows the programmer to use the functions known from PHP in JavaScript, by implementing their capabilities and syntax. Of course it’s about equivalents of PHP functions, implemented in JavaScript.

The library is available at http://phpjs.org/, and also on github.

This solution may be useful in many ways.

First of all, this may facilitate the migration of ready algorithms or codes written in PHP. In this case the time of (re)implementation will be much shorter.

We can also use this solution for convenience. For example PHP provides very useful and great in use function: date (date and time formatting).

Working with dates and time in JavaScript may be not so cool, so the way is to use the external library. And it may be php.js, which provides an equivalent of date() in JavaScript.

Dojo Toolkit in a nutshell. Part 3 — summary.

In the third section summarizing the basic course of Dojo Toolkit, we will see the creation of visual effects using this library.

Dojo Toolkit: effects and animations

Any self-respecting JavaScript framework includes solutions to support programming visual effects. It is no different in the Dojo Toolkit. The library since version 1.9 provides two modules: dojo/_base/fx and dojo/fx.

The dojo/_base/fx module gives the programmer the basic methods for effects, including animateProperty, anim, fadeIn or fadeOut, whilst the dojo/fx provides more advanced methods, such as chain, combine, wipeIn, wipeOut or slideTo.

So let’s move on to the practice.

Fading

This is a popular effect. Fading in / fading out ie appearance / disappearance of elements with animation. A simple example below.

HTML

<button id="fadeOut_btn">Fade out</button>
<button id="fadeIn_btn">Fade in</button>

<div id="fade_block" style="background-color: #f00; width: 40%">
  <h2>Some content here …</h2>
</div>

JavaScript

require(
    ["dojo/_base/fx", "dojo/on", "dojo/dom", "dojo/domReady!"],
    function(fx, on, dom) {

    var fadeOut_btn = dom.byId("fadeOut_btn"),
        fadeIn_btn = dom.byId("fadeIn_btn"),
        fade_block = dom.byId("fade_block");

    on(fadeOut_btn, "click", function(evt) {
        fx.fadeOut({ node: fade_block }).play();
    });

    on(fadeIn_btn, "click", function(evt) {
        fx.fadeIn({ node: fade_block }).play();
    });
});

Animation functions take one argument: the object with parameters. The most important is DOM node (ID of an element).

In addition to this, another feature that is defined with animations is their duration. This parameter is expressed in milliseconds (ms). In Dojo Toolkit it’s 350 ms by default.

At the end of the function call, we see .play(), which gives a signal to reproduce the animation.

Animation functions returns objects of dojo/_base/fx::Animation, and in addition also include: pause, stop, status, and gotoPercent methods.

Sliding

Fade manipulates the visibility of an element. And sliding (fx.slideTo) changes the position of element with animation effect. Below is an example of use.