
Today’s point is about how to perform file upload in JavaScript. OK — with a small help of other technologies, however, it’s about a single, cohesive and working solution.
Upload files in JavaScript
A basic file upload can be done in a simple manner. Just HTML file input and few lines of PHP code to handle it.
The use of JavaScript simply opens more possibilities, especially when it comes to UI effects, to inform about the progress or error messages.
And this is what we do in this small tutorial. Today will write about upload files in JavaScript, using a proven solution — Uploadify.
At the end we consider several alternatives for the implementation of file upload.
We use basic version, based on jQuery and the Flash (SWF) object. There is also version based on HTML5 capabilities (Uploadfive), but in this case we have to bear in mind the license fee.
Uploadify
With this solution we control everything from the JavaScript level. Almost every element is configurable, so we can fully customize the appearance of the plugin.
The use of plugin is very simple, for example:
$(function() {
    $("#file_upload_1").uploadify({
        swf           : '/uploadify/uploadify.swf',
        uploader      : '/uploadify/uploadify.php',
        width         : 180,
        height        : 32
    });
});
Let’s analyze all elements of the solution.
Using Uploadify
Requirements:
– PHP or other server-side technology, to implement the receiving and storing files on the server,
– Flash Player and jQuery on the client-side..
And we begin to work.
1. Download Uploadify and unpack.
The plugin is supplied with ready files (JavaScript, PHP, CSS), on which we can build. The final solution we can get very fast.
2. Create main file , index.php and include necessary .js scripts:
<script type="text/javascript"
  src="http://code.jquery.com/jquery-1.7.2.min.js"></script>

<script type="text/javascript"
  src="/jquery.uploadify-3.1.min.js"></script>
If we don’t have prepared CSS styles, we can use default style-sheet:
3. Add file input field:
<input type="file" name="file_upload" id="file_upload" />
4. Initialize Uploadify on this field:
$(function() {
    $('#file_upload').uploadify({
        'swf'      : 'uploadify.swf',
        'uploader' : 'uploadify.php'
        // … other options if needed
    });
});
5. Create new folder on the server (e.g. uploads, with rights 0755), where we put uploaded files.
We also need PHP script, which saves the uploaded files in the right place.
Additional data we can send in the formData parameter, for example:
$('#file_upload').uploadify({
  // …
  'method'   : 'post',
  'formData' : { 'foo' : 'bar' }
  // …
});
We defined here the “foo” parameter and the POST method. In PHP scripts our value will be available in a following way:
$someVar = $_POST['foo']; // bar
6. Prepare final code
We can use the uploadify.php script, which is ready to adjust to our needs.
Exemplary uploadify.php
$targetFolder = 'uploads'; // relative to the root

$verifyToken = md5('unique_salt' . $_POST['timestamp']);

if (!empty($_FILES) && $_POST['token'] == $verifyToken) {
    $tempFile = $_FILES['Filedata']['tmp_name'];
    $targetPath = $_SERVER['DOCUMENT_ROOT'] . $targetFolder;
    $targetFile = rtrim($targetPath,'/') . '/' . $_FILES['Filedata']['name'];

    // validate the file type
    $fileTypes = array('jpg','jpeg','gif','png'); // allowed file extensions
    $fileParts = pathinfo($_FILES['Filedata']['name']);

    if (in_array($fileParts['extension'], $fileTypes)) {
        move_uploaded_file($tempFile, $targetFile);
        echo $targetFolder . '/' . $_FILES['Filedata']['name'];
    } else {
        echo 'Invalid file type.';
    }
}
Whereas the client-side code might look like the following example:
<!DOCTYPE html>
<html>
<head>
<title>My Uploader</title>
<link rel="stylesheet" type="text/css" href="uploadify.css">
<script type="text/javascript" src="http://code.jquery.com/jquery-1.7.2.min.js"></script>
<script type="text/javascript" src="jquery.uploadify.min.js"></script>
</head>
<body>
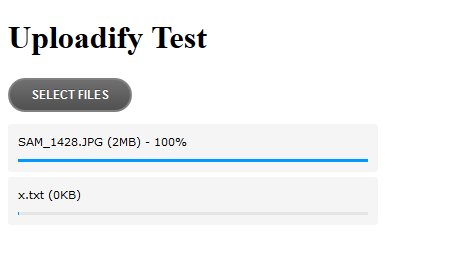
<h1>Uploadify Test</h1>
<form>
<div id="queue"></div>
<input id="file_upload" name="file_upload" type="file" multiple="true">
</form>
<script type="text/javascript">
<?php $timestamp = time(); ?>
$(function() {
$('#file_upload').uploadify({
'formData' : {
'timestamp' : '<?php echo $timestamp; ?>',
'token' : '<?php echo md5('unique_salt' . $timestamp); ?>'
},
'swf' : 'uploadify.swf',
'uploader' : 'uploadify.php',
'onUploadSuccess' : function(file, data, response) {
alert('The file was saved to: ' + data);
}
});
});
</script>
</body>
</html>
We define also a callback function, that informs the user about the completed save data on the server.
And that’s it. No our solution to upload files in JavaScript should be ready:
It’s a good idea to pay attention to other issues related with security.
Source code available: here.
Scripts are ready to use, we have configure paths, and optionally add file validation if needed.
In case of problems, there is helpful forum:
http://www.uploadify.com/forum/
More ways to upload files in JavaScript. Summary
In conclusion, I present other ready solutions.
– jQuery file upload:
http://blueimp.github.io/jQuery-File-Upload/
– interesting solution offered by Dojo Toolkit:
http://dojotoolkit.org/documentation/tutorials/1.9/uploader/
– jQuery HTML5 Uploader:
http://www.igloolab.com/jquery-html5-uploader/
– jQuery, PHP and creating progress bar for file upload process:
http://www.9lessons.info/2012/04/file-upload-progress-bar-with-jquery.html
And for those interested in Adobe AIR technology I recommend:
Adobe AIR Tutorial: an application to backup files on the server
That’s all in this article. Have fun with implementing file upload with JavaScript.
Thank you!
 Posted in
  Tags:
Tags: