A simple Halloween game in JavaScript — rapid development with jQuery

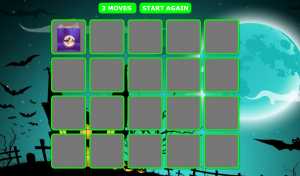
I love this atmosphere of Halloween! Having a free moment, I decided to create a simple game to fully feel the atmosphere.

Halloween game in JavaScript

It’s about the time not complicated requirements. For the project (and writing about on this blog) I had not too much time. Therefore, the aim was to create a game ASAP.

So in the shortest path, we’ll create a simple and well-known Memory game. Matched pictures disappear revealing a stunning background 🙂

The result looks like this:

halloween-game-javascript

So let’s code!

Object reflection in JavaScript

Today a small reflection about the object reflection. I’ll try to be concise.

Object reflection in JavaScript

Reflection of objects is not just a curiosity, but also a tool, which we can meet more often than we think. And it may turn out to be this, what we need when we stuck with some issue.

The reflection mechanism allows us to work with the code in the same way, as with the data.

This means that we can operate on the code as on the data, and create our own structures modifying the standard operation of the language.

Reflection is usually encountered in high-level languages​​, most often based on a virtual machine. Such techniques are probably well known by developers of languages such as Python or Ruby.

When necessary, also in the JavaScript code we can use the object reflection!

The main thing in this case is an overview of the elements, on which our object is built. And this is what we will do now.

Viewing object components

This is possible through the Object.getOwnPropertyNames method.

Example — Math object:

alert(Object.getOwnPropertyNames(Math));

The result will be similar to following:

[toSource,abs,acos,asin,atan,atan2,ceil,cos,exp,floor,imul,fround,log,max,min,pow,random,
round,sin,sqrt,tan,log10,log2,log1p,expm1,cosh,sinh,tanh,acosh,asinh,atanh,trunc,sign,cbrt,
E,LOG2E,LOG10E,LN2,LN10,PI,SQRT2,SQRT1_2]

With just one line of code we received really valuable information that can be further processed.

jQuery plugins collection — useful and interesting extensions

Here is a small jQuery plugins collection. I worked with them and I think they are noteworthy.

jQuery plugins collection

Amount of jQuery plugins is really overwhelming. It’s almost impossible to view all of them. On the other hand, if we need a jQuery plugin implementing some task, almost surely we will find what we’re looking for.

1. Sticky Plugin

Sticky is a jQuery plugin, giving the opportunity to attach any element on the page, so that it is always visible, independently from scrolling the page.

Usage is very simple:

<script src="jquery.js"></script>
<script src="jquery.sticky.js"></script>
<script>
  $(document).ready(function() {
    $("#my-element").sticky({topSpacing: 0});
  });
</script>

Demo and the plugin to download:

http://stickyjs.com/

2. pwdMeter

This is a small plugin for measuring the strength of passwords. And in addition, a built-in strong password generator. The solution simple and effective.

pwdMeter jQuery plugin

pwdMeter jQuery plugin

Available at:

http://shouvik.net/pwdmeter.php

jQuery zClip

Copy to clipboard in Javascript — jQuery zClip

Today, a quick tutorial on how to copy to the clipboard in JavaScript. Sometimes in our web application project, may appear a requirement: allow copying of data to the clipboard programmatically from JavaScript, after the occurrence of some event.

Copy to clipboard in Javascript

For this we use my favorite JavaScript framework — jQuery.

In details it will be the jQuery zClip (jQuery ZeroClipboard) plugin.

Copy to clipboard in Javascript — using zClip

The task of copying data to the clipboard in JavaScript encounters a number of problems, mainly related to safety.

The zClip solution is based on Flash object (SWF file), which executes the right task, while the control is done in JavaScript.

Let’s try.

Step 1

Download a library:

http://www.steamdev.com/zclip/

In case of problems, we can also get the code directly from GitHub:

https://github.com/patricklodder/jquery-zclip

Then we attach jQuery and downloaded library to our project:

<script type="text/javascript" src="js/jquery.min.js"></script>
<script type="text/javascript" src="zclip/jquery.zclip.js"></script>
Zepto.js

The Zepto.js library

Recently we had to work on the project, which used the Zepto.js in frontend layer. This library intrigued me, so I decided to write a few words about it.

Zepto.js

Zepto.js is a lightweight JavaScript framework, which is doing very well, especially in the WebKit-based browsers. It has syntax mostly compatible with jQuery. So, for those familiar with jQuery, working with Zepto.js won’t be a problem.

Example:

$('#element').html("Hello!");

Can we use Zepto.js as a replacement of jQuery?

In general yes — they are compatible at the core level. Still, I would not recommend to rely on the solution developed in this way, without carrying out detailed tests.

In addition to standard features, which a modern JavaScript framework should provide, Zepto.js supports common features needed for mobile devices needs (detection of environmental, touch events).

Another advantage is the small size of the basic library, so it loads faster than, for example. jQuery.

So Zepto.js will a good choice for creating projects for mobile devices. Zepto works great with solutions such as PhoneGap.

On the border: CSS media queries

Today another article on the border. It’s about CSS media queries, which are very significant, especially in the context of modern web applications.

CSS media queries

In general, it’s a CSS3 module allowing content rendering to adapt to conditions such as screen resolution. This functionality is actually the core of Responsive Web Design (RWD).

Using media queries

We have to define the @media type and one or more expression concerning properties. If the device will fit into these conditions, then the defined CSS styles will be used.

Example:


@media screen and (min-width: 480px) {
    border: solid 1px;
}

CSS media queries can also be used to attach the whole CSS files.

Examples:


<link rel="stylesheet" type="text/css" href="my_file.css"
    media="(max-width: 800px)" />

<link rel="stylesheet" type="text/css" href="small_device.css"
    media="only screen and (max-width: 480px)" />

As you can see they are heavily used:

min-width and max-width parameters determining the minimum and maximum width of the screen, which satisfies the conditions for use of defined CSS rules.

Logical operators

It is possible to combine the different conditions using logical operators such as not, and, only.

Facebook

JavaScript Facebook API — programming Facebook applications

In today’s article I present a small set of issues, which I commonly used when working with the Facebook application development.

Programming Facebook applications

Of course, applications typically have components based on PHP SDK, but in general most of the functionality was created using a dedicated SDK for JavaScript Facebook API.

Programming Facebook Apps is a fairly broad topic in general, and also in the case of individual SDK (PHP, Mobile i of course JavaScript).

Not to mention all the complications and errors that can occur while developing real applications. We can add to that the hours spent at stackoverflow.com, and unfortunately also different requirements, restrictions and changes imposed by Facebook, that application developers simply have to respect.

Sometimes we need to change something in the older applications due to Breaking changes.

Yes it is, but at least the developer is not alone thanks to large communities centered around Facebook Apps Development.

OK, let’s do something practical.

JavaScript Facebook API

The basic step is to load and initialize the Facebook JavaScript SDK, and then — calling the FB.getLoginStatus() method.

Example:

// …
FB.getLoginStatus(function(response) {
  alert('OK');

});
// …

This method is used to check whether the user is logged in to Facebook (and our application) at all.

The standard operation of loading and initializing the SDK is presented in the next code example.

More about HTML5 Canvas. Animations, examples, tools.

Hello! It’s time for further exploration of HTML5 Canvas, by implementing the next examples. Today, slightly more advanced things like animation and other graphical operations.

HTML5 Canvas in examples

So let’s start.

To run examples quickly, we use the same very simple page template, as in the previous article.

A simple animation using HTML5 Canvas

Simple, because we will be animating (moving) one graphic object.

To create animations we will use the JavaScript functions, such as setTimeout or setInterval. We also add graphics operations on the HTML5 Canvas element, such as “drawing” objects on Canvas or cleaning the area (ctx.clearRect(0, 0, x, y)) to refresh whole “picture”.

Consider the following code:


// …

    function draw() {
        var canvas = document.getElementById(&quot;canvas&quot;);
        ctx = canvas.getContext(&quot;2d&quot;);

        anim_img = new Image(size_x, size_y);

        // start animation after loading the image
        anim_img.onload = function() {
            setInterval('myAnimation()', 10);
        }

        anim_img.src = 'resources/ff_anim.png';
    }

    function myAnimation() {
        // clean the area
        ctx.clearRect(0, 0, canvas_size_x, canvas_size_y);

        // after reaching the edge - change to the opposite
        // direction; so the effect of bounce from the edge
        if (x_icon &lt; 0 || x_icon &gt; canvas_size_x - size_x) {
            stepX = -stepX;
        }

        if (y_icon &lt; 0 || y_icon &gt; canvas_size_y - size_y) {
            stepY = -stepY;
        }

        // move the image …
        x_icon += stepX;
        y_icon += stepY;

        // and draw in new place
        ctx.drawImage(anim_img, x_icon, y_icon);
    }

// …

Learning HTML5 Canvas with JavaScript — step by step

We’ve already published a basic course of HTML5, with a solid foundation for learning (or reminders). With such basics we can dive into more advanced (and interesting) topics. Learning HTML5 Canvas can be disassembled into smaller parts, and to handle them step by step.

Learning HTML5 Canvas

Learning goes great through the implementation of specific examples, so… Here we go, with a simple way to start doing cool things in HTML5.

Let’s create a template, where we will run the test code:

<!DOCTYPE html>
<html lang="en">
<head>
    <meta charset="utf-8">

    <script type="application/javascript">
    function draw() {
        var canvas = document.getElementById("canvas");
        var ctx = canvas.getContext("2d");

        // the code goes HERE …

    }

    </script>
 </head>

 <body onload="draw()">
     <canvas id="canvas" width="500" height="300"
         style="border: solid 1px;"></canvas>
 </body>

</html>

At the very beginning: path and drawing straight lines. We use two functions:

moveTo(x, y) — defines the starting point of the line,

lineTo(x, y) — the ending point.

The line will be created between these two points.

Example #1 — drawing a line:

// …
ctx.moveTo(0, 0);
ctx.lineTo(300, 150);

// set line color
ctx.strokeStyle = '#0000ff';
ctx.stroke();

We define parameters of the line (e.g. color). After executing this code, we should get following result:

HTML5 Canvas: draw a line

HTML5 Canvas: draw a line

Simple. So now let’s try to draw a rectangle and a circle.

Less CSS

Working with LESS CSS

Welcome to the next article from the border of JavaScript and CSS. Today briefly about the tool Less CSS (or CSS/LESS) — JavaScript library, which could help the programmer with CSS.

LESS CSS

This library introduces a kind of dynamic style sheet language. LESS extends CSS by things known from dynamic languages​​, such as variables, functions, and even the (mixins).

The idea is just to write less code, and use such elements like variables and functions.

Using on client-side

You can make an earlier compilation (what is recommended for a production environment). For test purposes code interpretation in the browser is fine.

Our LESS CSS based code we put into the file with .less extension. Then we include it as normal CSS style sheet, but with the “stylesheet/less” type in rel parameter. The .less files must be included before JS library (less.js).

Example:

&lt;head&gt;
  &lt;link rel=&quot;stylesheet/less&quot; type=&quot;text/css&quot; href=&quot;tests.less&quot;&gt;

  &lt;script src=&quot;less.js&quot; type=&quot;text/javascript&quot;&gt;&lt;/script&gt;
&lt;/head&gt;

The simplest example of LESS CSS in action, is to define color variable in our .less file, as below:


@my_color: #ed0000;

h2 {
  color: @my_color;
}

.myClass {
  width: 100px;
  color: @my_color;
}

Color defined once as a named variable can then be used repeatedly in the code. A variable is identified by “@” (similar to “$” char for variables in PHP).