HTML5 Canvas, JavaScript and operations on images

Some time ago we got a small job. The subject: small research and creation of simple on-line editor for images, which should be editable from HTML5 Canvas and JavaScript level. Then the user should be able to save / send the final image. Today we present the basic elements and some examples related to this subject.

HTML5 Canvas, JavaScript and images

Basically we need (all the necessary libraries are included in our ready example):

– advanced JavaScript libraries: base64.js, canvas2image.js, jsmanipulate.js,

– PHP files, where we will process the data,

– images (jpg, png) to process.

Steps to do:

1. Load image from file JPG or PNG file to the HTML5 Canvas element (or draw a simple picture directly, using Canvas methods)

2. Perform some graphics operations on this picture

3. Get the modified contents of the Canvas, so that you can save it in a file

The 3rd point was most important in our case.

A whole magic was performed through one simple method — toDataURL() of the HTML5 Canvas object:

var strDataURI = oCanvas.toDataURL();
// returns "data:image/png;base64,iVBORw0KGgoAAAANSUhEUgAAAMgA…"

This method returns the Canvas content as data: URI. This allows for further operations, such as converting and saving the data in the form of the final file.

jQuery tutorial: a nice, horizontal sliding menu

In today’s tutorial we create a simple horizontal menu with images and animation.

jQuery tutorial — horizontal sliding menu

The whole we will do in a few simple steps.

1. Necessary files

We will need:

– css/style.css and js/menu_funcs.js files, where we put our styles and JavaScript code for menu handling,

– 5 (or more if we want wider menu) images; in our jQuery tutorial we use images with 320x200px dimensions,

– jQuery and the jquery.easing plugin for animation effects.

jQuery tutorial - an example of menu

jQuery tutorial — an example of menu

2. HTML skeleton

In the HTML document (index.html) we create a skeleton of our menu.

Creating jQuery plugins — our own extensions in practice

Today we present another tutorial about creating jQuery plugins, from practical point of view.

Creating jQuery plugins — further steps

The development of a plugin may be in a way as shown below. We define the elements — options and functions:

(function($) {

  // extend with a new function
  $.fn.myFunctionExt = function(param) {
    alert("The parameter is: " + param);
  };

  // …

  // plugin code
  $.mySimplePlugin = function(options) {

    var myVar1 = 'A',

    …,

    actions = {

      doSomething: function() {
        // …
      },
    },

    // calling …
  };
})(jQuery);

Let’s do something practical, by adding more code.

Example — our own jQuery plugin:


(function($) {

    // we extend jQ by new simple function
    $.fn.myFunctionExt = function(param) {
        alert("The parameter is: " + param);
    };

    // standard CSS modifier for elements
    $.fn.myCSSModifier = function() {

        return this.css({
            margin: '5px',
            padding: '5px',
            border: 'solid 2px #f00',
        });
    };

    // plugin code
    $.mySimplePlugin = function(options) {

        // define properties and methods
        var str = 'abdef',
        number = 128,
        arr = ['One', 'Two', 'Three', '…'],

        actions = {
            test_alert: function() {
                this.myFunctionExt('X1');

                // this.myFunctionExt(str);
                this.myFunctionExt(arr[1]);
            },

            test_css: function() {
                // apply for all elements in body
                // this.myCSSModifier();

                // apply only for specified element
                $('#d2').myCSSModifier();
            },

            default_action:  function() {
                alert('Bye bye!');
            }
        },

        // core processing - options

        body = $('body');

        if (options) {
            // multiple options
            if (typeof options == 'object') {
                for(i in options) {
                    if (options[i] != false && actions[i]) {
                        actions[i].call(body);
                    }
                }
            } else {
                // string - one option
                if (actions[options]) {
                    actions[options].call(body);
                }
            }
        } else {
            // no option specified - call default
            return actions['default_action'].call(body);
        }

    };

})(jQuery);

It is a fully working example. The result below.

Creating jQuery plugins — an introduction

The jQuery is a very popular framework. By using it, we very often also use plug-ins, which is really a lot. And we could say, that they are one of the strongest features of this library.

Tutorial: creating jQuery plugins

Plugin is an elegant and practical solution to implement the code based on jQuery, that will be used repeatedly.

This is a very valuable skill, so let’s start. We implement a jQuery extension, that will operate on the objects of the document.

An example of such method can be fadeOut(), which operates on specific elements:

$('#my_element').fadeOut();

Implementation of a simple jQuery plugin

The general form, which can be treated as a template might look like this:

valorant ESP

(function($) {
  $.fn.extend({
    myplugin: function(options) {
      this.defaultOptions = {};

      var settings = $.extend({}, this.defaultOptions, options);

      return this.each(function() {
        var $this = $(this);
      });
    }
  });
})(jQuery);

But let’s go to our practical example.

jQuery mobile

Learning jQuery Mobile — dialogs, panels, list. Summary.

Today we focus on further learning jQuery Mobile. We will discuss elements such as dialogs and lists.

Learning jQuery Mobile — next steps

We start with an important UI element — dialogs.

Basically, as in other cases, we rely on the definition of attributes for items.

For example:

<a href="foo.html" data-rel="dialog">Open dialog</a>

To see the jQuery Mobile dialogs in action, let’s consider the slightly larger example:

…
<a href="#dialog" data-rel="popup" data-position-to="window"
  data-role="button" data-transition="pop">Dialog demo</a>

<div data-role="popup" id="dialog" data-overlay-theme="a"
  data-theme="c">
  <div data-role="header" data-theme="a">
    <h1>Delete it?</h1>
  </div>

  <div data-role="content" data-theme="d">
    <h3>Are you sure you want to delete this item?</h3>
    <p>Lorem ipsum …</p>
    <a href="#" data-role="button" data-inline="true"
      data-rel="back" data-theme="c">No</a>
    <a href="#" data-role="button" data-inline="true"
      data-rel="back" data-theme="b">Yes</a>
  </div>
</div>
…

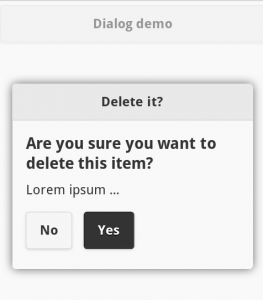
The result (running on Opera Mobile Emulator):

tutorial-jquery-mobile_dialog1

The full example here.

In the code above we see a lot of new attributes, but we obtained the effect with a little effort.

jQuery mobile

Forms in jQuery Mobile

We continue mastering of jQuery Mobile through implementation of examples. The forms are today’s subject.

Forms in jQuery Mobile

In this case we work normally, by adding HTML5 elements and attributes.

The following example shows a simple form elements (inputs) of various types:

…
    <div data-role="page">
        <div data-role="header">
            <h1>Forms - demo</h1>
        </div>

        <div data-role="content">
            <form action="" method="post">
                <div data-role="fieldcontain">
                    <label for="mypassword">Password</label>
                    <input type="password" id="mypassword" />
                </div>

                <div data-role="fieldcontain">
                    <label for="mycolor">Color</label>
                    <input type="color" id="mycolor" />
                </div>

                <div data-role="fieldcontain">
                    <label for="mysearch">Search</label>
                    <input type="search" id="mysearch" />
                </div>

            </form>
        </div>
    </div>
…

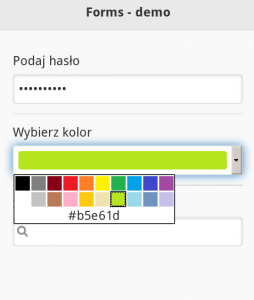
A sample view in the Opera Mobile Emulator:

Forms in jQuery Mobile — a simple example

Forms in jQuery Mobile — a simple example

A full example here.

To set the kind of field, we define the value of the “type” attribute, for example type=”color”.

Further examples are checkbox and radio fields.

Learning jQuery Mobile — UI, buttons, icons, transition effects

Today another tutorial and further learning jQuery Mobile, through the implementation of examples.

Learning jQuery Mobile

We’ll start with buttons and icons. The basic example below — creating a button and adding CSS class:

…
  <div data-role="main" class="ui-content">
    <button class="ui-btn">My button</button>
  </div>
…

In the previous article we talked about pages and transitions between them. The transition was initiated after clicking on a link. Now we’ll create a more powerful example with buttons.

Example — UI buttons and the transitions between pages:

…
    <div data-role="page" id="pageone">
        <div data-role="header">
            <h1>Buttons demo</h1>
        </div>

        <div data-role="main" class="ui-content">
            <a href="#pagetwo" class="ui-btn">Go to NEXT page</a>
        </div>

        <div data-role="footer">
            <h1>Footer - first page</h1>
        </div>
    </div>

    <div data-role="page" id="pagetwo">
        <div data-role="header">
            <h1>Page 2</h1>
        </div>

        <div data-role="main" class="ui-content">
            <a href="#" class="ui-btn" data-rel="back">Go back</a>
        </div>

        <div data-role="footer">
            <h1>Footer - second page</h1>
        </div>
    </div>
…

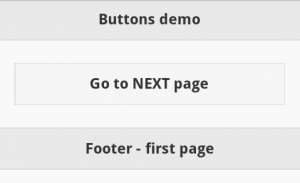
The result running on Opera Mobile Emulator:

jquery-mobile-buttons-pages-demo

A full example here.

Grouping buttons

The buttons can be grouped in various ways.

jQuery mobile

jQuery Mobile tutorial — an introduction

Today, I think there is no doubt about the important role of mobile devices. They are becoming more widely used. Graphical user interfaces are key.

For developers of different technologies, the main task is to ensure that applications will work properly on the limited hardware and small touch screens.

Web applications have a big importance on this field, and one of the solutions is jQuery Mobile, which extends capabilities of jQuery for creating interfaces dedicated to work on mobile devices.

jQuery Mobile

The jQuery Mobile is JavaScript framework, which extends jQuery with additives useful and even necessary to create Web applications that work with mobile devices.

What this gives us?

First of all, a very high compatibility with devices / browsers. Most browsers on modern devices can use all the possibilities offered by jQuery Mobile.

Current information about the support in browsers available here: Graded Browser Support.

The library relies heavily on HTML5, CSS3 and of course JavaScript. We obtain a complete set of user interface elements, which is adapted for mobile devices, especially those with touch screen.

The whole gives a very good working interface, which also provides animation effects. A special note for “pages” and transitions between them. All this may allow user to get the impression, that he’s working with the native mobile application.

jQuery Mobile also offers support for events typical for mobile applications (e.g. tap).

Example:

$('div').on('tap', function(event) {
    alert('You tapped DIV element');
});

Take a look at the possibilities:

http://jquerymobile.com/demos/

http://www.jqmgallery.com/

jQuery Mobile = a great design of UI elements

We can not only to place very good looking controls, but also replace the styles for all elements in easy way.

HTML5 custom attributes — define own attributes!

Do you want something great? No problem — in HTML5 we can find a lot of great things. You probably know that HTML5 introduces new elements, but it’s not everything!

We can define HTML5 custom attributes — new, our own attributes, adjusted for our needs.

HTML5 custom attributes

The data-* attributes are used to store our custom data for page (application) elements. We can put them in any HTML elements.

However, we should pay attention to:

– the names of our own HTML5 attributes should start with the “data-” prefix, followed by at least one character,

– the name shouldn’t contain uppercase letters,

– attribute value can be any string.

Syntax:

<element data-*="somevalue">

In JavaScript to our own attribute we refer simply by getAttribute() method.

Practical example should illustrate action of HTML5 attributes defined by ourselves.

Example — using HTML5 custom attributes:

<!DOCTYPE html>
<html lang="en">
<head>
    <meta charset="utf-8">
    <title>Testing own attributes in HTML5</title>

    <script type="application/javascript">
    function showCarDetails(car) {
        var carBrand = car.getAttribute("data-car-brand");
        alert("The " + car.innerHTML + " => " + carBrand);
    }
    </script>
 </head>

 <body>
     <h1>Cars</h1>
     <p>Click to see related car brand:</p>

     <ul style="cursor: pointer; width: 200px;">
         <li onclick="showCarDetails(this)"
             id="Bora" data-car-brand="VW">Bora</li>
         <li onclick="showCarDetails(this)"
             id="Cruze" data-car-brand="Chevrolet">Cruze</li>
         <li onclick="showCarDetails(this)"
             id="Octavia" data-car-brand="Skoda">Octavia</li>
         <li onclick="showCarDetails(this)"
             id="S60" data-car-brand="Volvo">S60</li>
     </ul>
 </body>
</html>

Upload files in JavaScript

Today’s point is about how to perform file upload in JavaScript. OK — with a small help of other technologies, however, it’s about a single, cohesive and working solution.

Upload files in JavaScript

A basic file upload can be done in a simple manner. Just HTML file input and few lines of PHP code to handle it.

The use of JavaScript simply opens more possibilities, especially when it comes to UI effects, to inform about the progress or error messages.

And this is what we do in this small tutorial. Today will write about upload files in JavaScript, using a proven solution — Uploadify.

At the end we consider several alternatives for the implementation of file upload.

We use basic version, based on jQuery and the Flash (SWF) object. There is also version based on HTML5 capabilities (Uploadfive), but in this case we have to bear in mind the license fee.

Uploadify

With this solution we control everything from the JavaScript level. Almost every element is configurable, so we can fully customize the appearance of the plugin.

The use of plugin is very simple, for example:

$(function() {
    $("#file_upload_1").uploadify({
        swf           : '/uploadify/uploadify.swf',
        uploader      : '/uploadify/uploadify.php',
        width         : 180,
        height        : 32
    });
});

Let’s analyze all elements of the solution.